There are plastic/nylon clamps with teethe that you pinch together to lock down, but they can be hard to take off with out ruining them. But they’re cheap.
Our goal here is to (1) create very solid water cooling system and (2) do it as cheaply as possible. This entails buying things from several different sellers and making/modding as many parts as you can (though not required). I’m going to try and explain everything as basic as possible, and use the simplest methods to do thing. I think just about anyone can do this. First we will look at how much we would spend buying a good complete kit. The prices and links in this guide are for socket-A systems, but you should have no problem finding the P4 or A64 version of a waterblock.
Kit 1
This kit comes with the CritiCool PowerPlant II PCI Relay Card for powering your
pump with out running an extra cable out of the case. It also comes with Red
Line Water Wetter (anti-corrosive). Also, you use a T-line to bleed/fill your
system. You have the option to add whichever waterblock you like with this kit.
From the ones they have, you would definitely want the RBX waterblock.
NOTE: this kit does not come
with enough hose clamps. It comes with 10, you will need 13 if you get a dual
outlet waterblock, 15 if you add a GPU block.
$150 + $45 (for RBX waterblock) + S&H = $195 + S&H.
Kit 2
With this kit you fill/bleed the system with the bay-res
reservoir. I prefer a T-line, some people don’t like T-lines. It also comes with
D-tek’s SuperCool Coolant, which won’t stain your tubing like Water Wetter. It
comes with the White Water waterblock.
Upgrading to the Eheim 1250 pump and White Water waterblock the total comes to:
$225 + S&H These are two kits that will perform closely with the kit we are
going to put together (for much cheaper!).
It’s a good idea to browse through galleries of water cooled rigs when you are just starting out, it will give you a much better idea of how things work. CPU Waterblock: The waterblock is what is mounted to your CPU in order to remove the heat it is creating. It is very important to buy a good waterblock, because much of your system’s cooling performance relies on it. It is important to look at how well heat is removed from the CPU by the waterblock and how much the waterblock restricts your coolant’s flow rate.
The Little River Cascade (US$92 + S&H from Australia), D-tek White Water ($49.99), DangerDen TDX ($52.95), and DangerDen RBX ($52.95) are the best waterblocks out there. Check out this article for a comparison of the Cascade, White Water, and RBX. They perform very similarly with a given pump. Using the same exact pump, but switching out the waterblock, you would have different flow rates with each block due to the different levels of restrictiveness of each block. I would either get the White Water or DangerDen TDX. The TDX is less restrictive than the White Water, but the White Water dissipates heat better. If I was forced to choose, I would probably pick the White Water if you will be using the recommended Eheim 1250 pump. With most waterblocks, the water comes in the central inlet, and is exaugsted out of the two outside outlets. You would use a Y-fitting to join the two outlets. The TDX does not have two outlets, so no need for a Y-fitting, and it uses 4 less hose clamps, compared to the RBX or White Water.
GPU Waterblock: Does the same thing as the CPU block, but is used to cool the graphics card.
Pump: The pump will circulate the water in your system. The pump’s gallons per hour (GPH) rating, its max head rating, and its reliability/longevity are very important things to look at. The GPH of the pump tell us how many GPH the pump can output if nothing is restricting the flow of the water/coolant, and the pump is not pumping the water against gravity. The max head rating tells us how “strong” the pump is. This rating is how many feet above the pump, it can deliver the water. So from this we can tell how well the pump can overcome pumping water against gravity, or through a heater core or waterblock, where the flow of the water is restricted. I recommend the Eheim 1250, but if you wanted to 12VDC pump, this one would be great. If you can afford it, get the 12V pump. It should give you better flow rates in a high restriction system as well.
Coolant: The coolant absorbs the heat from the waterblock(s). General we use distilled or de-ionized water. It is a good idea to add some anti-biological additive to your coolant. Barqua Spa spa sanitizer works well. It’s expensive but it will last you forever. Just add about 4 drops and you won’t get that lovely algae build up. You can also add an anti-corrosive additive such as Zerex Super Coolant, Red Line Water Wetter, etc. I would only use an anti-corrosive if you had another metal besides copper and brass in your system. Copper/brass will cause the corrosion of aluminum if you do not have an anti-corrosive additive. 5% anti-corrosive, 95% water is the standard mix, plus anything else you want to add. UV reactive dye is another option.
Radiator: The radiator is where the heat of the water will be absorbed from the coolant and then released into the air. A good solution for a radiator is a ‘84 Chevrolet Chevette heater core. This is the part that is used to heat the cabin of your automobile. You could also choose to use a heatercore from a different car. The Chevette is popular because of it’s size (W6.25' x H7.25'). However, the Chevette heatercore has one 3/4' barb. Pulling the ½' tubing over it will be very difficult. So, you can replace it with a 1/2' or 5/8' barb.
Fan: On your radiator, you need a fan to circulate air through it. You don’t want the already warmed air sitting there. You always want cool air next to the fins. Two fans are better than one, but use the same make/model of fan.
Fan Shroud: To attach the fan to your radiator, you want to use a fan shroud. If you mount the fan tight against the radiator, there will be a “dead spot” where the fan’s motor is. No air will be circulating through the fins of the radiator at that spot since there are no fan blades circulating air there. We want to space the fan away from the radiator about 1.5'. This should also reduce the noise created by the fan as well.
Tubing: Tubing takes water from one component to the next. 1/2' inner diameter (ID), 3/4' outer diameter (OD), with 1/8' walls is standard. Clearflex60 is the brand most common in water cooling systems. The cheap vinyl tubing from Home Depot kinks easily when you bend a radius in it get it where you want it. Tygon is another brand that you can bend tightly with out having to worry a lot about creating a kink, but Tygon is over $3.00/foot in most cases.
Hose Barbs: Most of your devices will come with ½' OD hose barbs. If you get the heater core, you might have to replace the stock fittings with hose barbs.
Hose Clamps: These will clamp your tubing around the hose barbs, so the tubing doesn’t come off!
|
|
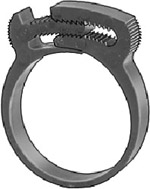
There are plastic/nylon clamps with teethe that you pinch together to lock down, but they can be hard to take off with out ruining them. But they’re cheap. |
|
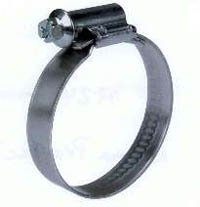
There are also the worm drive clamps used on automobiles. These clamps work fine, but they can cut into the tubing causing a leak. |
|
|
|
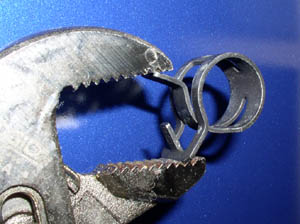
I love and use spring/Corbin clamps. You use a pair of pliers to squeeze the ears together, which widens the clamp. Then you slide one over the tubing and over the hose barb, and release the pliers; which lets the clamp tighten down on the tubing. |
Relays and Switches: Normal water pumps in the USA use 110VAC power, just like your monitor for example. Well, we have the pump inside the case, and the only power available in there is DC voltage. So we have a few options. (1) We can run a power cord out of our case to our surge protector (Cheap/easy but the computer can be turned on with out the pump running!). (2) Buy a CritiCool Power Plant PCI relay card (a bit expensive and uses a PCI slot). (3) Buy his Pump Relay Kit (requires cutting a small hole and mounting a bracket on your case, and you still have 2 cords attached to your case). Or (4) Put together our own relay/switch setup (cheaper, harder, custom). Read this article if you’re thinking about doing a custom job.
Y-Fitting: If your waterblock has two exhaust ports, you should use a Y-fitting in order to join the two ports back into one line. You don’t want to use a T-fitting for this, because the 90° angle will restrict flow more than necessary.
T-Fitting: Many people use a T-fitting to create a 3rd line, which runs to the top of their case. This line is called the filling/bleeding line or T-line. You use the T-line to pour water into the system, and to allow the air that was originally in your system to escape. You want the T-line at the highest part of your system possible, because air will float to the highest point.
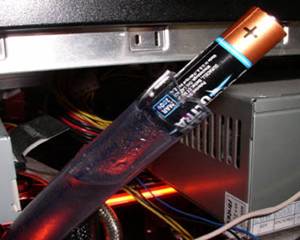
T-Line Plug: If you’re going to have a T-line for filling/bleeding, you’ll want something to plug it with after your done with it. There are many options. Put a cap on the threaded end of a hose barb, and plug the barb in. Plug it with a AA battery :). I hear the lids off of certain markers work well too. An empty Arctic Silver 3 syringe fits well also. And anything else you can find that fits!
DangerDen:
DangerDen actually makes almost all their water cooling products. You can buy
them directly from DangerDen, or buy them from one of DangerDen's resellers
(many of which are listed below). Each seller has almost everything price
matched with the other sellers. Great customer service!
D-tek:
D-tek carries most if not all DangerDen products, plus stuff from other makers.
They also have lights, case accessories, etc. They have a pretty large water
cooling selection. Good customer service and good prices on most things.
Cool Technica:
They have a very large selection, from many different makers. They also have
quite a bit of general cooling products. Prices are great on some things, not so
great on others. Great customer service.
Criticool:
Not that popular, and they don't have a huge selection; but they are very
competitive with pricing. They also sell to Canada!
Silicone
Valley Compucycle: SVC has water cooling products from
almost every maker out there. Some of it is good, some of it is bad. Great
customer service.
CrazyPC:
Carries a lot of Swiftec stuff. Great customer service. Ok prices.
I just want to say I have links to just about the cheapest place you can get each product from. So, for example, if you are placing an order to DangerDen for some stuff, you might as well order the Eheim 1250 from there also instead of buying it at Criticool for $1 less. You should save more than $1 in shipping. Just be aware of saving money on shipping.
|
Component |
Model and Link |
Quantity |
Price |
|
CPU Water Block |
White Water OR TDX |
1 |
$43.00 (for White Water) |
|
Pump |
1 |
$59.00 |
|
|
Radiator |
Chevy Chevette Heater Core (Buy at Advanced Auto Parts, Auto Zone, Checkers, NAPA, etc) |
1 |
$20.00 |
|
Radiator Fan |
Good 120mm Fan |
1 or 2 |
$12.00 (for one) |
|
Hose Barbs |
2 |
$2.00 |
|
|
Tubing |
10' |
$6.50 |
|
|
Hose Clamps (for ¾' OD tubing) |
Nylon Hose Clamps OR Wide-Band Self-Tightening Spring Hose Clamps |
20 |
$8.84 |
|
Fittings |
1 of each |
$2.24 |
|
|
Distilled/de-ionized Water |
Grocery Store |
1 Gallon |
$1.00 |
|
Material For Fan Shroud |
Medium gague steel, copper, or brass (Found at Home Depot, Ace, etc) |
10' x 12' Sheet |
$5.00 |
|
Anti-corrosive Additive (Optional) |
4 oz. |
$4.50 |
|
|
GPU Block (Optional) |
1 |
$39.00 |
|
|
Total: |
$164.08 + S&H + $39.99 for optional GPU block |
||
If you have the option, upgrade your waterblock to the brass top. The clear tops
have been known to crack, and the aluminum tops could get corroded sooner or
later despite the anodization (so use anti-corrosive). If you get the TDX, and
you know you don’t want a GPU block, you only need 9 hose clamps (plus any you
want to have as extras), and you do not need a Y-fitting. If you don’t feel up
to making your own fan shroud, you can buy one
here you panzy. But you can save about $6 making your own, I mean come on
$6!! $12 if you do the tupperware shroud. :D I would also recommend doing dual
fans on the radiator if you have room. Just make sure they are the same
make/model of fan, and both blow in the same direction. You can also buy a
heatercore with the barbs already installed
here. You big whimp. :) You can also get the heater core at
www.cooltechnica.com for the same price if that helps limit the number of
orders you make. You can get the Eheim 1250 for $58 and the Maze4 GPU block for
$38 at
www.criticool.com but I figure you will loose more than that on shipping
another order.
I put 5/8' hose barbs on my heater core, because since you have ½' ID tubing, you would like the ID of the hose barb to be around ½' as well. The reason being, anything less and it’s going to restrict your flow where it does absolutely no good. The ID of a ½' hose barb is close to 3/8'. There are two ways to attach the barb; one is soldering them on, the other is JB Welding them on. If you know how to solder, great do it that way. But be careful not to melt any of the solder that keeps the heatercore from leaking. If you don’t want to solder them on, I will explain how to JB Weld them on. You can pick up JB Weld at a hardware store such as Home Depot:
1) First, you must remove the old hose barb like fittings from your heater core. To do this, you can cut them off using a rotary tool (Dremel), or use a hack saw with a metal blade. Try and chop them off flush with the tank that they are mounted to. When cutting off the barbs, have the heater core positioned so that the barbs are pointed down, or so the heater core is up-side-down. This might make cutting a bit awkward, but it will insure any metal that falls into the tank of the heater core will not fall into the main body of the heater core - and plug up any channels. After the barbs are removed, tilt the heater core up-side-down again, and tap the core to try and get most metal shards to fall out. Just do whatever you can to get most of them out. Make sure the area is clean after cutting the old barbs off.
2) Now, read the JB Weld directions!
3) Put a barb into position on the tank. See if the hole and everything will line up correctly. If not, do what you need to do.
4) Mix up some JB Weld as the instructions direct, not getting any on your hands.
5) Spread some JB Weld around the hole in the heater core, don’t let any fall in! Now spread some around the threaded end of the hose barb itself. Get lots on!
6) Put the barb into position. It’s a good idea to clamp it there (not too tight though). If you have rubber gloves put them on and spread the JB Weld around the base of the barb. You want a nice bead connecting the barb to the core. You can use a plastic knife or something instead of rubber gloves (throw the knife away when done!).
7) If that barb is secured good, you can attach the next one. Then let them dry/cure.
8) After you have given them enough time to reach full strength, it’s time to test them out. Grab one and pull/push on it to see if it’s as strong as it should be. You don’t want to TRY and rip them off, but you want to make sure they are on there very securely. Test both barbs!
9) If they are stuck like a naked, fat, man laying on a leather couch in the dead of summer, then you can go on and sand off any JB Weld that would make your job look sloppy. Or if you plan on painting the outside of your core, you want it all to be smooth. So go ahead and make it perty!
10) You should leak test just the heater core after the JB Weld has dried 100%.
Now that we got our fancy barbs on, we need a shroud for the fan! There are, again, a couple of ways of doing this. We could make one out of sheet metal, or modify a Rubbermaid tupper-ware container! Here is an image of the tupper-ware shroud:
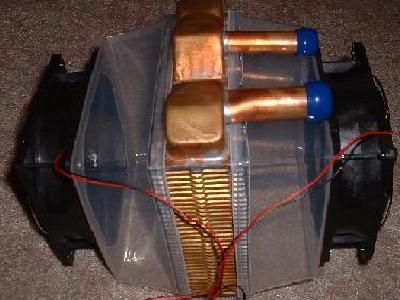
Now doesn’t that fit nicely! If you can’t figure
out how to do the tupper-ware shroud... then... Yeah... All you need to do is
cut a 120mm hole in the center of it, and make some holes for mounting the fan
to it. The tupper-ware shroud is by far the cheapest and is very easy to do.
Here is how you would go about making a very simple shroud made out of
sheet-metal. Feel free to make yours however you want. This is just a simple one
that, I think, almost anyone can make themselves. Some steps might seem a
bit complicated, but just re-read them and you should get it. Obviously, if you
are going to use two fans on your heatercore, make two shrouds.
1) Go to a hardware store and pick up a piece of sheet-metal at the minimum 10'x12' (assuming you will be using a 120mm fan and Chevette heater core). You can pick whichever type of metal you like. We are not going to start working with the sheet-metal yet. We will first make a cheap cardboard or paper template to practice and make sure everything will work perfectly. I happened to have a 11.5' piece of hardboard lying around, so that is what I will be using.
2) So cut a piece of your template material into a 9-3/4' x 10-3/4' rectangle. Be as precise as you can on every mark/cut you make.
3) Now measure 1-3/4' in on both ends, of all 4 outside-edges of the template and make a mark using a pen or fine tip marker. Now use a straight edge and your pen to connect the two marks on all 4 sides of the template. You should now have a rectangle 6-1/4' x 7-1/4' centered in your template.

4) Now, using the marks you just made, cut out the 1-3/4' squares that you have on each corner of your template.

5) Now you want to make a mark right in the center of your template. Do this by measuring in 4-7/8' from the two sides that are 9-3/4' apart; and 5-3/8' from the two sides that are 10-3/4' sides. The only reason you are making two marks in the same place (one measured from one side, the other from the opposite side), is in the case that your template isn’t exactly 9-3/4' x 10-3/4'. Then you can take the average/center of the two marks as the actual center. Once you have your marks, you can make one final dot right in the center of where the marks intersect.

6) Then take any regular CD (CD-R, AOL CD, anything like that), center it on your center mark, then trace around the outside with your pen.

7) Now just bend your template on your lines at a 90° angle. When you bend your actual sheet-metal, it maybe be easiest to find a solid corner (of a work table or something), hang the side that needs bending off of the edge, and start bending. A hammer can help in the bending process.
8) Now cut out the 120mm hole. When you do this with the actual sheet metal, you will of course have to drill a hole somewhere inside the 120mm to get your snips started.

9) Now test fit it! If you’re doing this with your cardboard or paper template, tape the corners together. The shroud should fit around the sides of your heatercore pretty well. If not, you’ll just have to adjust the angle of your bend to make it work. It should be very close.
10) Now that your template is done and you know it will work, you can start on the real thing. Cut your sheet-metal into a 9-3/4' x 10-3/4' rectangle, then center your template over it, and mark out all your edges.
11) Then you can just go back through steps 4, 7, 8, and 9, respectively. Just replace the word “template” with “sheet-metal”, and use metal snips instead of scissors. Take the line when cutting, meaning cut on the inside edge of your mark (leaving no mark).
12) Now you need to drill some holes to mount your fan. Center the fan over the 120mm hole, mark through each of the fans mounting holes, then driller appropriately.
13) Now you need to attach the corners of your shroud. I used JB Weld, if you have another way you want to do it that’s groovy. After making sure your corners are bent where you want them and lining up, mix some JB Weld up, and spread some on there. If your corners aren’t co-operating, secure them somehow :D. Make sure you apply some from the inside, which is a pain. Then let it dry, bracing all the corners so they don’t come apart. After that has dried you might want to put on another coat. After you’re done applying JB Weld and it has dried, you can sand the outside of the corners down. Dremels make sanding easier/faster!
14) Ok, it’s time to attach the shroud to the heater core. If doing the corners seemed easy enough using JB Weld you might try using it to attach it to the heater core. But then it is almost permanent. Many people run threaded rods though the fan, shroud, and heatercore; then attach nuts on each end. When installing the fan, you want the fan to suck air through the heater core and blow it into the case.
15) Now you can paint your shroud if you wish. Mask off the finned area of the heatercore first. Before you install the fan: Prime it, then paint it!
If you are comfortable enough with that, you could make the shroud’s sides have a 45° angle, instead of being square. That way it is more “aero dynamic.” To do this, you will just have to change the dimensions and not cut out a complete 90 degree area on each corner.
Many cases have a lower hard disk drive rack in the way of where the heater core would go, such as the Chieftec Dragon case. If you have one of these in the way, you have to remove it. You can either drill out the rivets, or try and pry them out. If you plan on putting your heatercore in the front of your case (which I will assume), then you will want to cut a hole in the front, metal, panel of your case to allow for air flow.
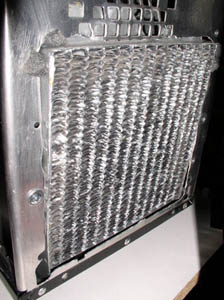
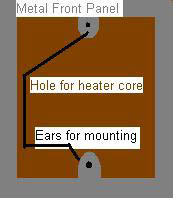
If you have chosen to attach the fan and shroud with threaded rods and bolts, then you may want to leave 2 or 4 “ears” on the sides of you rectangular hole; then drill some holes in them and run the bolts all the way through so the heater core is mounted to the case with the same bolts that you have mounted your shroud with. But you have to make sure you mark out where the ears/holes have to be pretty accurately. Here is a image to help out.
1) First you need to take off the plastic panel that is on the front of your case. Sometimes they have them screwed in through the inside; other times they just are snapped in.
2) To mark out the holes, set the heater core in the front of your case, against the front panel of your case. Then either from inside or outside, mark out the edges with your trusted sharpy. Then you can start cutting it out using some tin snips. You again might have to drill a hole to get started, but you might be able to find a place to start the snips in already. Remember, you can always trim more off, you can’t add any back.
3) Most waterblocks mount using the 4 socket mounting holes found around your CPU socket. So in order for us to mount our block, we either need to take out the motherboard, mount the block, then put the motherboard back in; Or when everything is out of the case, cut an “access hole” in the panel (motherboard tray) that you motherboard mounts to. That way you can mount/unmount your water block without taking anything out of your case. Just find out where the rectangular hole needs to be, and how big. Then drill a hole to get your snips started, then cut around it with your tin-snips. Putting Everything Together I will assume you have your computer components installed normally with the exception of a heatsink on your CPU. If you don’t want to cut out a section of your motherboard tray as mentioned in the previous step, you will have to take out your motherboard in order to mount your CPU block. Also, if you have a cramped case, you may have to install things in a different order or do some sort of finagling.

Generally you put your components in the following order:
Pump –> Radiator –> CPU block –> GPU block (optional) –> Back To Pump
If you have a GPU block, just make the adjustments for it when assembling your system. I am going to go through everything assuming you don’t have a GPU block. Having a GPU doesn’t really change anything. You just run your tubing a bit different. For the first time putting a system together, I would hook everything up and put it in place before filling the system. That way if a piece of tubing is too short, or something doesn’t work right, you can always change it when there’s no water in the system. Later on when working on your system when you know everything works, you can take the watercooling system out as one “piece” and do whatever you need to do, bleed it, then put it back as one piece. First you need to figure out where your T-line is going to go. You want the T-line at the highest part of your system as possible. In my description, I am going to put the T-line between the heater core outlet and the CPU block inlet. If that’s not going to work for your system, then just make the necessary adjustments.
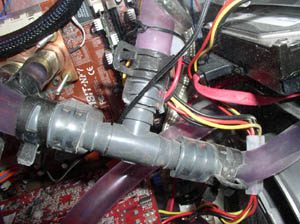
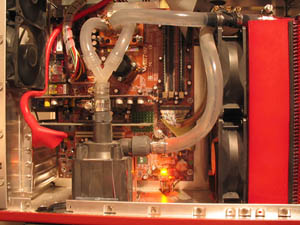
Things can be a little trickier for a 3-barbed waterblock, but that’s ok. We need to join the two outside barbs of your CPU block using your Y-fitting. One concern here is that you need to get the tubing from your Y-fitting to your pump inlet or GPU block. To do that you’re obviously going to have to bend the tubing. One problem can be the width of your case and the length of the Y-fitting coming off your CPU. If things aren’t done right, you won’t be able to bend your tubing tight enough to get it to your pump and still be able to get the side panel of your case on. There are two options to keep this from happening. Cut the tubing that goes from your CPU outlets to the Y-fitting pretty short, around 2.5'. That way you will have as much room as possible to bend the tubing from the Y’s outlet to wherever it needs to go. The picture will probably help you get my drift.
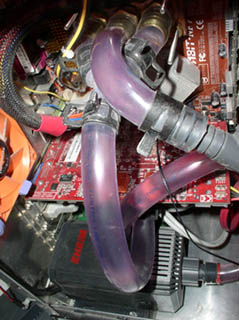
My side panel can just fit on with the way the tubing is now. If I made the bend radius any smaller, I would have more torque on my graphics card and I might get a kink in the tubing. If the bend radius was larger, my side panel wouldn’t fit on. Another way of getting the tubing to the pump or GPU block is to keep the tubing coming off the CPU block outlets pretty long, and add the Y-fitting after you have cleared your side panel.
1) Decide if you want to make the tubing coming off your CPU block’s outlet very short, or long. Then estimate the length and cut two pieces of tubing to go from your CPU block outlets to the Y-fitting. Install the tubing on your CPU block outlets and clamp them.
2) Estimate the length of the tubing you will need to go from the T-fitting to the CPU block’s inlet. Be sure it’s long enough. You can always chop some off, and you should have plenty of tubing. Put that piece of tubing on your waterblock’s inlet and clamp it. Install and clamp the other end of the tubing on your T-fitting.
3) Cut another piece of tubing to go from your heater core’s outlet to the T-fitting. The left barb of the heater core is the inlet, the right is the outlet, though it probably doesn’t matter much. I would try and get the T-fitting centered right between your CPU block and heatercore. If you are off one way or another, it’s no big deal. Install that piece of tubing on your heatercore. Clamp it!.
4) Put a piece of tubing (uncut) on your heater core’s inlet. Stick the heater core assembly in the case. Don’t bash it against any electronics. You can use some weatherstrip material to seal around the edge of the heater core that will be placed against the front of your case. That way you insure that it pulls only fresh air in. Mount it to the front of your case however you see fit. :-)
5) Then place your pump wherever you want it to go. Cut the piece of tubing coming off the heater core’s inlet so that it can be installed on your pump’s outlet. Install and clamp that piece.
6) Take the pieces of tubing that you have already installed on your CPU block’s outlets, and install them onto the Y-fitting, and install your clamps. Make sure you know which side is going to be the “top” of your waterblock when your install it, and make sure that you have the Y-fitting below the piece of tubing on your inlet. It will be harder to get the tubing from your Y-fitting to the pump or GPU block it is not below the other piece of tubing. Take a look at one of the pictures in this guide if you don’t understand.
7) Cut a piece of tubing to go from the top barb of your T-fitting to the top of your case. Install that piece and clamp it.
8) Put one end of the leftover piece tubing on the outlet of your Y-fitting and clamp it. Now install your waterblock on your CPU as described in your waterblock’s instructions (which could be online). Use a good thermal compound as always, and don’t over tighten your waterblock. I install the threaded rods on the motherboard first, making sure they are secure, then slide the block over the rods, and finish mounting. Different waterblocks mount differently sometimes. If necessary, install your motherboard now.
9) Now you can install the piece of tubing that is hanging off your waterblock’s inlet onto the T-fitting and clamp. Then install the piece of tubing from your Y-fitting’s outlet to the pump’s inlet or the GPU block if you have one. Lastly, connect the piece of tubing coming off your heater core’s outlet onto the T-fitting and clamp.
10) Double check that everything is installed and clamped.
Explanation of bleeding: You have to get the water into your system some how, right? When you first put the system together air is in your lines. To get the water into the system I like to use a T-line. The only purpose of this line is to give you a place to pour everything in and let air out. If you’re using an anti-corrosive, you have two option for mixing your coolant:
Option 1 (easier!): Get a gallon of distilled/de-ionized water, pour it into a larger container, then add 6.4 ounces of anti-corrosive (or 4oz if that is all you have), close container tightly, shake (not stir :p) container. And there is your coolant. Mark on the container “TOXIC! DON’T DRINK! BAD! TOXIC!” Or something like that. You now have enough coolant to fill 3-5 watercooling systems!
Option 2: As you fill your system with water, measure or estimate the amount of water you are pouring into your system, then find 5% of that. That is how much anti-corrosive to add. You don’t want to have your system 98% filled then try and get 5% of anti-corrosive in. It’s not going to happen. So you have to pour water in, get some air out of your lines (to allow for more fluid), pour 5% of anti corrosive in, then pour some more water in, then pour some more anti-corrosive in, and so on. I would prefer having less than 5% of anti-corrosive, opposed to more than 5%. The first way is easier yes? But I will use the second method since it is more complex (needs more explaining).
1) Once everything is together, it’s time to fill the lines with coolant! Get a funnel, put it in your fill/bleed line, and pour some of your distilled/de-ionized water in. If you plan on using an anti-corrosive additive, it’s a good idea to keep track of about how much water you have used. That way you know about how much anti-corrosive to add. Once the water level is about 4 inches from the top of your bleed line, stop pouring in water.
2) Now carefully tilt your case back and forth (make sure you don’t splash water out of your T-line). As you tilt the case, you will see air pockets moving around. Tilt the case so that the air pockets make it to the T-line and float out of the system. Your water level will have dropped due to the amount of air being removed from your system. Now if you want to use an anti-corrosive, find the amount of water you have poured in so far, take 5% or that, and that is the amount of additive to add at this point. If you’re using spa sanitizer to keep any biological growths from appearing in your system later on, pour some into the cap of the bottle, and just pour about a teaspoon in (Sanitizer is not good for you! Don’t measure it out with any cooking tools, just guess on the amount. Don’t even touch the stuff). NOTE: Some spa sanitizer doesn’t react well with anti-corrosive. It turns it into a gel... kinda. Just use as little of each as possible.
3) Now pour in enough water to get your water level back to about 5 inches below the top of the T-line. Then tilt your case back and forth some more to get more air out. While doing this, keep an eye on your tubing to see if there are any pockets of air left (there could be unseen air in your heater core/waterblock). If you see pockets of air, get most of them out.
4) Once the water level gets below your T-fitting, you have to pour in more water. Also add about 5% of anti corrosive, if you're using any. Then look around for air pockets one more time. If you see major ones, try and get them to float out. Then top off your T-line off with water yet again.
5) Now double check that there are no obvious leaks. There shouldn’t be unless you messed up big. Now plug the T-line with something just to make sure water doesn’t spit out of it when you start your pump. Before you start your pump there will be small air pockets left in your lines. Starting the pump will turn the air pockets into tiny bubbles. Plug-in and/or power up your pump with-out the computer on. Now unplug your T-line.
6) As the water and bubbles cycle through the system, the bubbles will pass through the T-line, and some of the bubbles will float up the T-line, and out. It will take a few hours for most of the bubbles to be removed, but that’s ok, you have to leak test your system for at least 24 hours! Just keep an eye on the coolant level and keep adding water as needed. The level of coolant in your lines might drop as much as 2 inches the first half hour (depending on how much air was left in the system). If the water level drops any more than that, check carefully for leaks (which you should be doing anyways). Your waterblock, fittings, and joints are all possible spots for leaks. But if you have everything clamped down correctly and added your fittings to the heater core correctly, you should be fine. You can put a paper towel or two down at the bottom of your case and below any fittings. This will help you be able to spot any water that has dripped from a leak.
7) Once it’s been 24 hours and you have no leaks, you are free to fire up your system. Make sure the pump is running as well as the fan on your heater core. Go into your BIOS and keep an eye on your CPU temperature for the first minute just to make sure the waterblock is mounted correctly. At a stock CPU speed, your CPU temperature should be around 35C-42C full load (room temperature will affect your temps quite a bit). After that you’re free to start overclocking/using your bad mahmuh-jahmuh system!
!CONGRATULATIONS!