I recently bought a Brian Moore MC/1.P13 guitar on E-Bay, and when I finally plugged it into my new and deep-discounted (due to the introduction of the VG-88) Roland VG-8, I found that it didn't seem to work properly. The signal was very weak: so weak that it was not really possible to get much sound out of the VG-8, even with the string sensitivities at 100. I found that by twisting the male plug where it attached to the guitar, I could get a good strong signal, so long as I kept some torque on the plug. If I was very careful not to move, I could even play for a bit before the connection would be interrupted again. The system worked fine with a different Roland-ready guitar.
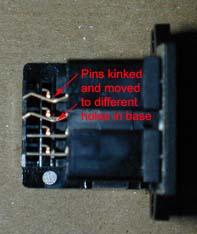
So, I took the MC/1 apart to see what, if anything, might be wrong, and discovered one of the 7 volt pins was not making a good connection.
Here are the steps I found necessary to get to the connector and the RMC PolyDrive-1 circuit board assembly it is soldered to:
I tested the connector by plugging my only 13-pin cord into the PolyDrive, and checking the continuity between each pin on the far end of the cord and the solder joint from the connector on the bottom of the PolyDrive pc board, and found that one of the 7 volt pins was only making intermittent contact. I had hoped that I could just crimp down the female pin in the connector, but due to the construction of the connector, this seems impossible.
I ordered new connectors from DigiKey, and wrote to RMC for advice. RMC was really great in the help they gave me with this. RMC said they had better connectors they would sell for $6 (about double the DigiKey price, but trivial in this context) so I ordered some of those too. RMC also gave me some good advice on doing the repair, and reassured me that I could do the job if I was careful and if I practiced on some scrap boards.
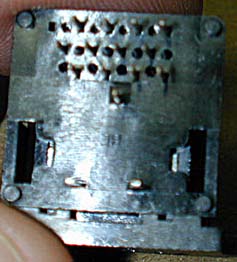
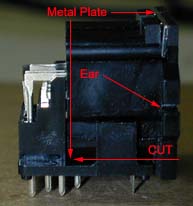
The RMC connectors were indeed better than the DigiKey (at least to my untrained eye) because they had an additional metal reinforcement where the little hook on the Roland cable clicks into the connector. However, RMC had to take the connectors apart and reposition the pins in the bottom plate on the connector to make them line up with the holes in the PolyDrive board before they sent them to me, which meant crimping some of the pin assemblies to shorten them slightly. The RMC-supplied connectors also had little mounting ears on the side that I clipped off with diagonal cutters because they wouldn't fit through the cut-out in the side of the guitar. The DigiKey parts look identical to the connector that was malfunctioning.
I had access to a vacuum desoldering device, but I'd never used it. I thought I would just be able to desolder the 15 pins on the connector and remove it, but it turns out that was a bit optimistic. RMC suggested I could use an Exacto saw to cut through the connector so I could remove the pins one at a time, and this proved necessary because there always seems to be a speck of solder that re-attaches pins to the holes.
So, I carefully took about 15 minutes to cut most of the way through the connector level with the bottom of the inner part of the connector. I cut back until just past the little ears that hold the top portion to the bottom portion of the connector. Then I cut down from the top of the connector to hit the first cut and remove the front of the connector, exposing most of the pins to the grip of fine needle-nose pliers.
The next part of the job required 2 people, and I was lucky to have a friend who is quite skilled with electronics work to help. While he ran the de-soldering pen and held the board, I pulled out the remains of the pins. With the connector finally removed, we resoldered the holes (so we could get good heat transfer) and then removed the solder with the vacuum, one person holding the board and one person soldering and de-soldering. After getting the holes clean, we removed the flux from both sides of the board with flux remover.
We put the new connector on the board, and trimmed the pins nearly flush with the bottom of the board. The pins are quite soft, so it takes sharp cutters to pinch them off rather than squeezing them thin. The new connector has four tiny feet on its corners, so it looks like it isn't properly seated on the board, even though it's as far down as it will go.
There are many sites on the web that describe soldering on a pc board. I wouldn't try it without having practiced some, because these are really tiny little pads, in my opinion. With the two of us, and my experienced friend managing the soldering iron, the soldering went easily. We removed the flux from the bottom of the board again after carefully inspecting for solder bridges or poor joints.
When I put everything back together and plugged it in, it "just worked." What a relief.
The total repair took about 2 hours, including taking the guitar apart a second time, but not including the original disassembly and testing to isolate the problem to the connector.